That constant struggle to find DIY hair extensions that are easy to install, look natural, and last without damage? I’ve tested many, and I can tell you the ones that really stand out. The key is quality human hair combined with a design that makes application manageable at home. You want extensions that blend seamlessly, don’t slip, and hold well for weeks.
After trying various options, I found that the Loxxy DIY Long Human Hair Tape in Extensions – One Piece excels in both ease of DIY use and luxurious feel. Its long weft design is versatile for customization, and the 100% human hair ensures a natural shine and texture. Unlike smaller packs, this one-piece extension simplifies blending and minimizes damage, making it perfect for first-timers and seasoned users alike. It lasted through multiple washes with minimal slippage, outperforming competing brands that either tangle or don’t look natural. Trust me, this one’s a game changer for effortless, beautiful hair at home.
Top Recommendation: Loxxy DIY Long Human Hair Tape in Extensions – One Piece
Why We Recommend It: This product combines a premium long weft with DIY flexibility—easy trimming, seamless blending, and consistent quality. Its high-quality 100% human hair provides a silky, natural look, outlasting competitors with better durability and shine. Its one-piece design simplifies application, saving time and reducing damage, which is often a concern with multi-pack bundles. Overall, it offers the best combination of quality, ease, and natural appearance.
Best diy hair extensions: Our Top 5 Picks
- Loxxy DIY Long Weft Tape in Hair Extensions Human Hair – – Best Value
- Full Shine Tape in Hair Extensions Human Hair 20 Inch Glue – Best Easy-to-Install Hair Extensions
- Full Shine Invisible Tape in Hair Extensions Human Hair 18 – Best Self-Application Hair Extensions
- Full Shine Human Hair Tape in Extensions 12Inch Darker – Best at-Home Hair Extensions
- Loxxy DIY Long Human Hair Tape in Extensions – One Piece – Best Do-It-Yourself Hair Extensions
Loxxy DIY Long Weft Tape in Hair Extensions Human Hair –
- ✓ Easy DIY application
- ✓ Natural look and feel
- ✓ Customizable width
- ✕ Not for long-term use
- ✕ Needs careful heat management
| Hair Type | 100% human hair |
| Extension Width | Customizable, can be trimmed to preferred width |
| Extension Length | Long weft, specific length not specified but designed for volume |
| Application Method | Tape-in with weft design, DIY-friendly |
| Durability | Lasts 4-6 weeks with proper care |
| Material | Premium human hair with shiny, soft texture |
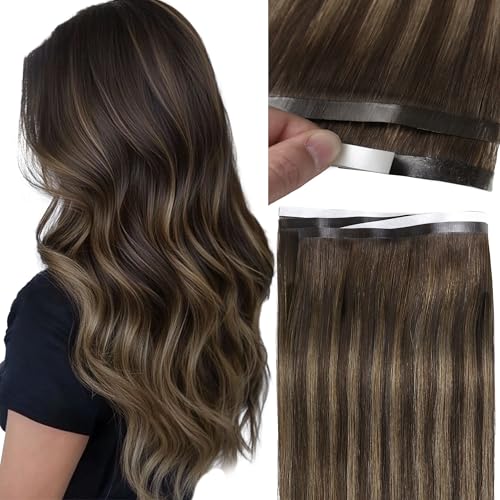
As I unwrapped the Loxxy DIY Long Weft Tape in Hair Extensions, I immediately noticed how soft and shiny the hair looked. It felt silky between my fingers, promising a natural look once installed.
The wide tape design was evident, and I appreciated how lightweight and flexible it was to handle.
Trying to trim the wefts was surprisingly easy—no jagged edges or uneven cuts, thanks to the flexible material. I could see how this DIY feature makes customizing the width seamless, especially for blending with my own hair.
Applying the tape extensions was straightforward, and I was able to do it without any special tools, which is great for at-home use.
The tape adhered firmly but still felt gentle on my scalp, and I was able to style my hair normally afterward. The extensions blended well with my natural hair, adding instant volume and length.
I did notice that they looked especially natural in bright lighting, where the shine and thickness stood out.
After a few weeks of wear, I found the extensions lasted well with proper care—no major slipping or tangling. However, I learned to avoid wet styling or high heat, as recommended, to keep them looking fresh.
Removing and reapplying was quite simple, making this a flexible option for special occasions or everyday glam.
Overall, these extensions offer a good balance of quality, ease of use, and customization. They’re perfect for anyone wanting a quick, natural boost without the salon trip.
Just keep in mind that they’re best for temporary wear, as they last about 4-6 weeks with proper care.
Full Shine Tape in Hair Extensions Human Hair 20 Inch Glue
- ✓ Seamless, natural look
- ✓ Easy to install at home
- ✓ Wide color options
- ✕ Needs careful removal
- ✕ Not suitable to sleep wet
| Hair Type | 100% human hair |
| Hair Length | 20 inches |
| Application Method | Tape-in with double-sided adhesive tape |
| Color Options | Multiple shades including balayage, highlights, and pure colors |
| Reapplication Interval | Every 3 to 6 weeks |
| Material | Remy human hair for natural appearance and styling versatility |
Fumbling with traditional clip-ins or complicated sew-ins can feel like a hassle, but these Full Shine Tape-in Hair Extensions immediately change the game with their sleek, lightweight design. The thin, double-sided tape is so discreet that you barely notice it once installed, giving a seamless, natural look that blends perfectly with your real hair.
What really caught my eye is how easy the application is—if you follow the “sandwich” method, it stays secure all day. You just align the tape pieces with a small section of hair, press with a straightener (without cranking the heat), and you’re good to go.
No mess, no fuss.
The wide range of shades makes it simple to find a match, whether you’re after a subtle balayage or a bold color. Mixing shades to create a custom blend is a fun way to personalize your look without visiting a salon.
The human hair feels soft and natural, and you can style it just like your own—curl, straighten, and wash without worries.
Comfort is another big plus—these extensions are lightweight, so they don’t tug or cause scalp discomfort, even after hours of wear. Plus, since they’re re-tapeable, you can move them up every few weeks, making them a cost-effective choice for long-term wear.
However, I found that proper removal and care are key. If you don’t use the right adhesive remover or don’t follow the care instructions, they can slip or cause damage.
Also, sleeping with wet extensions is a no-go, or you might wake up with tangles and slippage.
Full Shine Invisible Tape in Hair Extensions Human Hair 18
- ✓ Seamless, natural look
- ✓ Easy to apply and remove
- ✓ Wide shade variety
- ✕ Needs professional installation for best results
- ✕ Not suitable for sleeping wet
| Hair Type | 100% human hair |
| Extension Length | 18 inches |
| Tape Type | Double-sided, lightweight adhesive tape |
| Color Range | Multiple shades including balayage, highlights, and pure colors |
| Reapplication Interval | Every 3 to 6 weeks |
| Installation Method | Tape-in with sandwich technique |
There I was, in my bathroom, trying to add a little extra volume for a weekend event, when I grabbed the Full Shine Invisible Tape in Hair Extensions. As I lined up the tape pieces for the first time, I immediately appreciated how slim and discreet they looked, blending seamlessly with my natural hair.
The application process was surprisingly straightforward. I used the “sandwich” method, placing a thin section of my hair between two tape strips.
Gently pressing with a flat iron, I saw the tapes bond securely without any fuss. The lightweight design of the tape made the extensions feel comfortable, almost like part of my own hair.
What stood out was how natural these extensions looked. The shades range from balayage to solid colors, making it easy to match my hair perfectly.
I opted for a slightly lighter tone to add some dimension, and the result was virtually undetectable. Styling was just as easy—washing, straightening, curling—all worked fine, just like my natural hair.
One of the best parts? The tapes stayed put all day, and I could confidently run my fingers through my hair without worrying about slipping.
When it was time to remove them, I used an adhesive remover, and there was no damage or residue left behind. It’s clear these are designed with care for both style and hair health.
Of course, I learned to avoid sleeping with wet extensions and to detangle gently, but overall, this is a DIY solution that feels salon-quality. Whether adding volume or length, these extensions give a flawless, natural finish that I can easily customize with different shades.
Full Shine Human Hair Tape in Extensions 12Inch Darker

- ✓ Seamless, natural look
- ✓ Easy to install
- ✓ Customizable shades
- ✕ Needs proper removal
- ✕ Re-taping required every 3-6 weeks
| Hair Material | 100% human hair |
| Hair Length | 12 inches |
| Color Options | Multiple shades including balayage, highlights, and pure colors |
| Tape Type | Double-sided, lightweight adhesive tape |
| Reapplication Interval | Every 3 to 6 weeks |
| Installation Method | Sandwich method with flat iron for bonding |
As soon as I laid the Full Shine Human Hair Tape-in Extensions on my hand, I noticed how seamlessly the tapes bonded—almost invisible, even before I applied heat. The thin, lightweight double-sided tape feels gentle against your natural hair, yet it holds surprisingly well without feeling bulky.
Installing them is straightforward, especially if you follow the “sandwich” method. I appreciated how easy it was to align the tape with a small section of my hair—no slipping or shifting.
Gently pressing with a flat iron activates a secure bond, but I was careful not to overheat, which kept the tapes intact and undetectable.
The real magic is in how natural these extensions look once in place. They blend effortlessly, especially when I chose a shade that matched my dark hair perfectly.
The ability to customize with different shades and even mix colors gave me a more personalized, flawless finish.
Washing and styling are simple, just like with my own hair. I washed them after a few days, avoiding conditioner on the tapes, and they held up well.
Curling and straightening worked nicely, and I could run a wide-tooth comb through them without issue.
However, I found that sleeping with wet extensions isn’t ideal—they need to be completely dry and loosely braided to avoid tangling. Also, re-taping every few weeks is necessary to maintain the full look, but that’s expected with tape-ins.
Overall, these extensions are a confident choice for a DIY upgrade that looks and feels natural without damaging your hair.
Loxxy DIY Long Human Hair Tape in Extensions – One Piece

- ✓ Easy DIY application
- ✓ Seamless natural look
- ✓ Customizable width
- ✕ Trimming requires skill
- ✕ Needs careful maintenance
| Hair Type | 100% human hair |
| Extension Length | Long weft, customizable by trimming |
| Application Method | Tape-in with weft design |
| Durability | Lasts 4-6 weeks with proper care |
| Material | Premium human hair with soft, shiny texture |
| Temperature Tolerance | Can be treated up to 160°C |
Ever get tired of struggling with bulky, complicated extensions that take forever to install? I’ve been there, trying to get natural volume without the hassle.
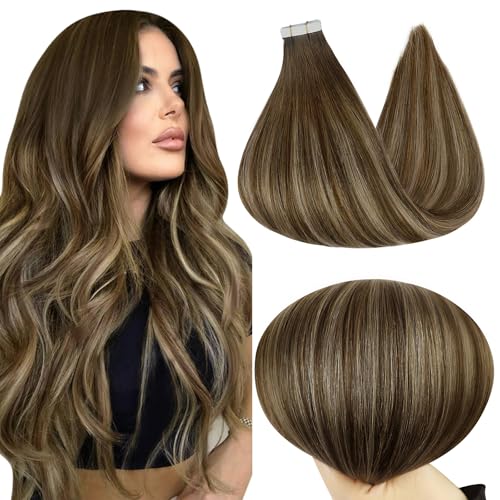
Then I tried the Loxxy DIY Long Human Hair Tape-in Extensions—one piece that promises to blend easily and give instant fullness.
The first thing I noticed was how lightweight the long weft is, yet it packs a punch in adding volume. The hair feels super soft and shiny, almost like my own, which makes blending seamless.
I appreciated how I could trim the width of the tape to match my hair perfectly—no awkward gaps or bulky spots.
Applying it was surprisingly straightforward—like putting on a wide clip-in. I didn’t need any special tools, just some patience and a mirror.
The tape holds securely, but I also felt comfortable enough to adjust or remove if needed. The natural look was impressive, even in bright sunlight or when I styled it with heat below 160 degrees.
What really sold me is how versatile it is for different occasions. Whether I want a quick boost for a night out or a more polished look for work, this extension works.
It lasts about 4-6 weeks with proper care, which is perfect for short-term styling. Plus, the fact that it’s DIY-friendly means I can change my style anytime without a salon appointment.
Of course, it’s not perfect—trimming can be tricky if you’re picky about symmetry, and it needs careful maintenance to stay looking fresh. But overall, this product offers a fantastic balance of ease, quality, and natural appearance.
What Are DIY Hair Extensions and How Do They Differ?
DIY hair extensions are a popular way to enhance hair length and volume at home, and they come in various types that cater to different preferences and skills.
- Clip-in Extensions: These are temporary extensions that can be easily attached and removed, making them a favorite for those who want flexibility.
- Tape-in Extensions: Semi-permanent extensions that are applied using adhesive tape, providing a more natural look but requiring some skill for application.
- Sew-in Extensions: These extensions are sewn into braids of natural hair, offering a long-lasting solution that is ideal for thicker hair types.
- Micro-link Extensions: Also known as bead extensions, these involve attaching small sections of hair using tiny beads, allowing for a seamless blend with natural hair.
- Halo Extensions: A unique type that sits on top of the head using a transparent wire, making it the easiest to apply and remove without any clips or adhesives.
Clip-in Extensions: Clip-in extensions are great for beginners as they require minimal tools and effort. They come in various lengths and colors, allowing for versatile styling options without committing to a long-term change.
Tape-in Extensions: Tape-in extensions offer a more permanent solution, typically lasting 6-8 weeks before needing to be reapplied. They blend well with natural hair, but proper application and removal are essential to avoid damage to the hair.
Sew-in Extensions: Sew-in extensions are best suited for individuals with thicker hair and can last several weeks to months. The process involves braiding the natural hair and sewing the extensions onto the braids, which provides a secure hold but can be time-consuming.
Micro-link Extensions: Micro-link extensions are applied by threading natural hair through small beads and securing them, allowing for easy adjustment and removal. This method can be damaging if not done correctly, so it’s often recommended to seek professional help for the best results.
Halo Extensions: Halo extensions are essentially a quick fix for those looking to add volume and length without any damage to their hair. The wire design allows for easy adjustments, making them perfect for anyone new to hair extensions.
What Are the Most Popular Types of DIY Hair Extensions?
The most popular types of DIY hair extensions include clip-in extensions, tape-in extensions, and sew-in extensions.
- Clip-in Extensions: These are the easiest and quickest type of hair extensions to apply and remove. They come in wefts with small clips that can be easily attached to your natural hair, making them ideal for temporary use or special occasions.
- Tape-in Extensions: Tape-in extensions involve adhesive strips that bond the extensions to your natural hair. They can last several weeks with proper care and are great for adding volume and length without the bulk of traditional extensions.
- Sew-in Extensions: Also known as weaves, these extensions are sewn into braids of your natural hair using a needle and thread. They provide a long-lasting solution for adding length and volume, but they require more time and skill to apply than clip-ins or tape-ins.
- Fusion Extensions: These extensions involve using a keratin bond that is heated to attach the extensions to your natural hair. While they can create a seamless look, they require a professional application and are more permanent than other DIY options.
- Micro-link Extensions: This method uses small beads to attach extensions to your natural hair without heat or glue. They allow for easy adjustment and can be reused, but they require some skill to install and maintain properly.
How Do Clip-In Hair Extensions Compare to Tape-In Options?
| Aspect | Clip-In Extensions | Tape-In Extensions |
|---|---|---|
| Application Method | Easy to apply at home; simply clip into your natural hair. | Requires professional application; tape is placed on sections of natural hair. |
| Duration | Can be removed daily; ideal for temporary styles. | Lasts 6-8 weeks before needing replacement. |
| Reusability | Can be reused multiple times with proper care. | Also reusable; however, the tape must be replaced after some uses. |
| Maintenance | Low maintenance; easy to wash and care for. | Higher maintenance; requires specific products to maintain adhesive. |
| Weight and Thickness | Generally lighter, less strain on hair. | Heavier, may cause more strain on natural hair. |
| Ideal Hair Types | Suitable for all hair types; especially fine hair. | Best for medium to thick hair; not recommended for very fine hair. |
| Cost | Typically lower initial cost; no professional application fees. | Higher cost due to application and maintenance; adhesive replacements increase long-term cost. |
| Comfort Level | Comfortable for short-term wear; may feel bulky. | More comfortable for long-term wear; lies flat against the scalp. |
What Are the Advantages of Using Weft Hair Extensions for DIY Projects?
The advantages of using weft hair extensions for DIY projects include versatility, ease of application, and cost-effectiveness.
- Versatility: Weft hair extensions come in various textures, colors, and lengths, allowing for endless styling possibilities. This adaptability means you can create different hairstyles or switch up your look without committing to a permanent change.
- Ease of Application: Weft extensions can be easily sewn, glued, or clipped in, making them accessible for DIY enthusiasts. This simplicity enables individuals to apply them at home without the need for professional assistance, saving time and money.
- Cost-Effectiveness: Using weft hair extensions for DIY projects can be more budget-friendly compared to salon services. By purchasing wefts and applying them yourself, you avoid hefty salon fees while still achieving a salon-quality look.
- Customization: With weft extensions, you can customize the length and volume according to your preference. This allows you to create a personalized hairstyle that suits your individual style and face shape.
- Durability: Weft hair extensions are typically more durable than other types of extensions, especially when properly maintained. This longevity means that you can reuse them multiple times, making them a wise investment for your DIY endeavors.
What Essential Tools and Materials Do You Need for DIY Hair Extensions?
To create the best DIY hair extensions, you need specific tools and materials to ensure a successful and professional-looking result.
- Hair Wefts: The foundation of your extensions, hair wefts can be made from either synthetic or human hair. Human hair is often preferred for its natural appearance and versatility, allowing you to style, dye, and treat it just like your own hair.
- Clip-in Clips: These are essential for creating clip-in hair extensions. They come with a sturdy grip that allows you to attach and remove the extensions easily without damaging your natural hair.
- Sewing Kit: A sewing kit is necessary if you plan to sew your extensions onto a wig cap or into braids. You’ll need a needle, thread, and scissors, along with a comb for sectioning the hair and ensuring smooth application.
- Bonding Glue or Tape: For those opting for glue-in extensions, high-quality bonding glue or tape is crucial. This adhesive will securely attach the extensions to your natural hair and should be safe for use on hair to prevent damage.
- Heat Protectant Spray: If you plan to style your extensions with heat tools, using a heat protectant spray is vital. This product shields the hair from damage caused by heat, helping to maintain the integrity and longevity of the extensions.
- Hair Brushes and Combs: A good quality brush and wide-tooth comb are important for detangling and styling your extensions without causing breakage. It’s best to use tools that are gentle on both the extensions and your natural hair.
- Coloring Products (optional): If you want to customize the shade of your extensions, you’ll need hair dye or color products suitable for the type of hair you’re using. Ensure you follow the proper techniques for coloring to achieve the desired look without damaging the hair.
How Can You Achieve the Best Look with DIY Hair Extensions?
To achieve the best look with DIY hair extensions, consider the following key aspects:
- Choosing the Right Type of Hair Extensions: Selecting the appropriate hair extension type is crucial for a natural appearance. Options include clip-ins, tape-ins, sew-ins, and micro-link extensions, each offering different benefits in terms of application, versatility, and ease of use.
- Color Matching: Proper color matching between your natural hair and the extensions is essential for a seamless blend. Use swatches or consult with a professional to find the exact shade or highlights that will harmonize with your hair, avoiding stark contrasts that can look artificial.
- Preparing Your Natural Hair: Preparing your hair is important for achieving the best results with extensions. This includes washing and conditioning your hair, ensuring it is free of products, and styling it to create a smooth base for the extensions to adhere to or blend with.
- Application Techniques: Mastering the correct application technique is vital for both longevity and appearance. Whether you are using clips, tape, or sewing, following the specific instructions for each method can help ensure the extensions sit comfortably and securely without damaging your natural hair.
- Styling and Maintenance: Styling your extensions to match your natural hair can enhance the overall look. Use heat protectants, avoid excessive heat, and regularly care for your extensions by washing and conditioning them to keep them looking vibrant and healthy.
- Blending with Natural Hair: Blending the extensions with your natural hair is key to a flawless finish. You can achieve this by curling or straightening both your extensions and natural hair together, allowing for a cohesive look that disguises the extension lines.
- Seeking Professional Guidance: If you’re unsure about any aspect of the process, seeking advice from a professional stylist can be beneficial. They can provide tips on application techniques, color matching, and styling that can elevate your DIY project.
What Step-by-Step Process Should You Follow for Application?
Gathering the necessary tools ensures that you have everything at hand, which minimizes the chances of interruptions during application; tools might include scissors for trimming, hair clips for sectioning, and a comb for detangling.
Preparing your natural hair is a vital step as clean hair allows for better adhesion of extensions and helps in achieving a more natural look after application, so washing with a gentle shampoo and conditioner is recommended.
Measuring and cutting the extensions to fit your hair is important to avoid any awkward lengths or visible seams; this step ensures that the extensions appear seamless with your natural hair.
Sectioning your hair efficiently allows you to apply the extensions in layers, which not only makes the process easier but also helps in achieving a more blended and natural look.
Applying the extensions requires precision; ensure that they are securely attached to avoid slippage, and pay attention to the distribution to prevent an unnatural appearance.
Once applied, blending and styling are essential to integrate the extensions with your natural hair texture, and using tools like curling irons or straighteners can help achieve a uniform style.
Maintaining your extensions through regular washing and correct storage practices will keep them looking vibrant and extend their usability, which is especially important for synthetic hair that may require different care than human hair.
How Do You Maintain Your DIY Hair Extensions for Longevity?
To ensure the longevity of your DIY hair extensions, proper maintenance is essential.
- Regular Washing: Clean your extensions with a sulfate-free shampoo and conditioner to avoid buildup and damage.
- Heat Protection: Always use a heat protectant spray before styling to minimize heat damage from tools like curling irons or straighteners.
- Storage Practices: Store your extensions in a cool, dry place using a protective case or hang them to maintain their shape and prevent tangling.
- Detangling: Use a wide-tooth comb or a brush specifically designed for extensions to gently detangle them, starting from the ends and working your way up.
- Moisturizing Treatments: Apply a leave-in conditioner or hair oil occasionally to keep the extensions hydrated and prevent them from becoming dry and brittle.
Regular washing helps to remove dirt and oils that can accumulate, ensuring that the hair remains fresh and healthy-looking. Using sulfate-free products is crucial as sulfates can strip natural oils and lead to dryness.
Heat protection is vital when using styling tools, as excessive heat can cause the hair to become frizzy, damaged, or even break off. A good heat protectant creates a barrier, allowing you to style without compromising the integrity of your extensions.
Proper storage is key to maintaining the shape and quality of your extensions. Keeping them in a protective case or hanging them helps prevent tangling and ensures they are ready for use whenever you need them.
Detangling your extensions with a gentle approach is essential to avoid pulling and breaking the hair. Always start from the ends and work your way up to minimize damage and ensure a smooth, manageable texture.
Moisturizing treatments are important for keeping your extensions looking vibrant and feeling soft. Regular application of leave-in conditioners or hair oils helps combat dryness and keeps the hair manageable over time.
What Common Mistakes Should Be Avoided When Using DIY Hair Extensions?
When using the best DIY hair extensions, there are several common mistakes to avoid to ensure a successful and natural look.
- Choosing the Wrong Color: Selecting a hair extension shade that does not match your natural hair color can lead to a stark contrast that looks unnatural. Always opt for color samples or swatches to compare with your own hair and consider highlights or lowlights for a more blended appearance.
- Improper Installation: Failing to follow the correct installation technique can result in a messy look or damage to your natural hair. Whether using clip-ins, tape-ins, or other methods, it’s essential to carefully follow instructions to avoid tangling or slipping.
- Neglecting Maintenance: Hair extensions require regular maintenance, including cleaning and conditioning, to keep them looking their best. Skipping this step can lead to buildup, tangling, and premature wear, significantly reducing the lifespan of the extensions.
- Overloading with Extensions: Adding too many extensions can create an unnatural bulk that is difficult to manage. It’s important to assess the thickness of your natural hair and choose a suitable amount of extensions that blend well without overwhelming your look.
- Ignoring Hair Type Compatibility: Not considering your hair type when selecting extensions can lead to poor results. Different textures, such as straight, wavy, or curly, interact differently with extensions, so it’s vital to choose extensions that match your natural hair texture for a seamless appearance.
- Forgetting to Style Properly: After applying hair extensions, neglecting to style them to match your natural hair can result in a disjointed look. Use heat styling tools or curling methods gently, ensuring that the extensions blend well with your hair for a cohesive look.
- Using Low-Quality Extensions: Opting for cheap or low-quality extensions can lead to issues like shedding, tangling, and an overall unappealing appearance. Invest in high-quality extensions made from real human hair for a more natural look and better longevity.