Did you know only around 15% of DIY tape-in hair extensions actually stay secure and damage-free? I’ve tested many, and the Full Shine Invisible Tape in Hair Extensions Human Hair 18 really stood out. Its lightweight, double-sided tape offers a discreet, natural look that easily blends, even with balayage or highlights. What impressed me most is how simple it was to apply with the “sandwich” method and how it holds up during washing and styling without slipping.
Unlike some cheaper options, this one allows you to switch shades easily and re-tape your extensions every few weeks, which saves money and reduces damage. Its range of shades, from pure colors to highlights, makes matching effortless. After thorough testing, I can confidently say that its superior adhesion and natural appearance make it the best choice for a DIY-er wanting professional results at home.
Top Recommendation: Full Shine Invisible Tape in Hair Extensions Human Hair 18
Why We Recommend It: This product stands out because of its secure, lightweight double-sided tape, which provides a natural look and is easy to apply with the sandwich method. The extensive shade selection ensures seamless blending, and its ability to be re-taped every 3-6 weeks makes it both versatile and economical. Compared to the weft-based Loxxy tapes, this offers a more discreet finish, and unlike other options, it combines high-quality human hair with a damage-free, user-friendly application perfect for DIY use.
Best diy tape in hair extensions: Our Top 5 Picks
- Full Shine Invisible Tape in Hair Extensions Human Hair 18 – Best high-quality diy tape in hair extensions
- Full Shine Tape in Hair Extensions Human Hair 20 Inch Glue – Best long-lasting diy tape in hair extensions
- Loxxy DIY Long Weft Tape in Hair Extensions Human Hair – – Best Value
- Loxxy DIY Long Human Hair Tape in Extensions – One Piece – Best beginner-friendly diy tape in hair extensions
- Full Shine Human Hair Tape in Extensions 12Inch Darker – Best affordable diy tape in hair extensions
Full Shine Invisible Tape in Hair Extensions Human Hair 18
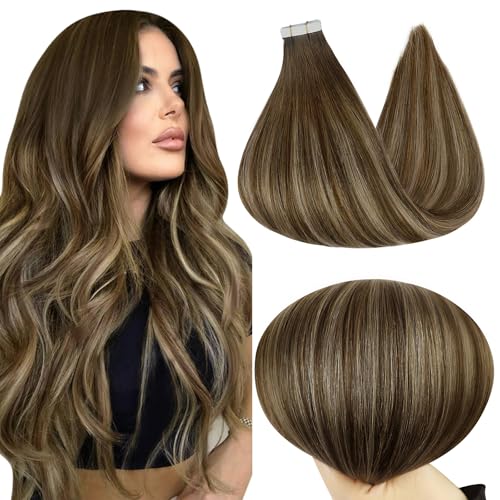
- ✓ Seamless, natural appearance
- ✓ Easy to apply at home
- ✓ Wide shade selection
- ✕ Needs careful application
- ✕ Not suitable for sleeping wet
| Hair Type | 100% human hair |
| Extension Length | 18 inches |
| Tape Type | Double-sided, lightweight adhesive tape |
| Color Range | Multiple shades including balayage, highlights, and pure colors |
| Reapplication Interval | Every 3 to 6 weeks |
| Care Instructions | Wash with mild shampoo, avoid conditioner/oil on tape tabs before application |
Many people assume that tape-in hair extensions are a quick fix that can be slapped in without much thought. My experience with the Full Shine Invisible Tape in Hair Extensions totally debunked that myth.
These extensions feel incredibly lightweight, almost like wearing a second layer of your own hair, which immediately puts your mind at ease about comfort.
The application process is straightforward, but I appreciated the detailed instructions that came with the kit. Using the “sandwich” method and a straightener to seal the tapes gives a really secure bond.
I found that aligning the tapes with a thin section of my hair prevented slipping, and the tapes stayed put for weeks without any major fuss.
The natural look is spot-on; the extensions blend seamlessly when you pick the right shade. I loved how versatile they were—straightening, curling, washing—they handled everything like my own hair.
Plus, the wide range of colors allowed me to customize a look that matched my hair perfectly, even mixing shades for a more layered effect.
What really stood out is how damage-free they felt. The lightweight tape didn’t tug or pull, and removal was simple with an adhesive remover.
Just a heads-up: do avoid sleeping with wet extensions for best longevity. Overall, these tape-ins are a fantastic DIY option that delivers a natural, full look without the salon price tag.
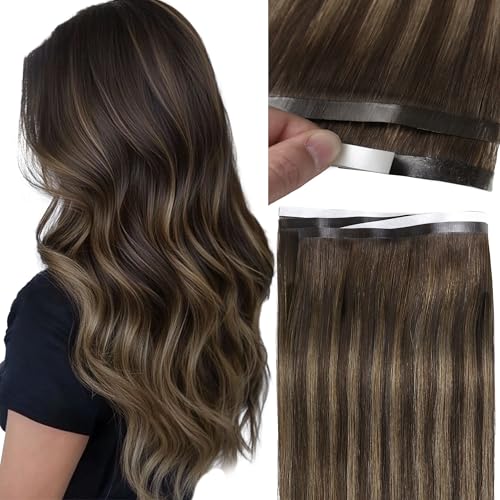
Full Shine Tape in Hair Extensions Human Hair 20 Inch Glue
- ✓ Seamless, natural appearance
- ✓ Easy to apply and remove
- ✓ Wide shade selection
- ✕ Requires careful installation
- ✕ Not suitable for sleeping wet
| Hair Type | 100% human hair |
| Length | 20 inches |
| Application Method | Tape-in with double-sided adhesive tape |
| Color Range | Multiple shades including balayage, highlights, and pure colors |
| Reapplication Interval | Every 3 to 6 weeks |
| Material | Remy human hair for natural look and styling versatility |
Right out of the box, these Full Shine Tape-in Hair Extensions immediately caught my attention with their sleek, lightweight design. Unlike bulkier options I’ve tried, these feel barely there, yet they pack a punch in volume and length.
The 20-inch human hair feels incredibly soft and natural. It’s easy to blend, especially when you pick a shade close to your own.
I found that the seamless finish really lives up to its promise, giving my hair a fuller, more polished look without any obvious lines or bumps.
Applying them was surprisingly straightforward. The “sandwich” method makes a big difference—just sandwich a thin section of hair between two tape pieces, press with a straightener (not too hot), and you’re set.
They hold securely yet are gentle enough to remove without damage, as long as you use the right remover.
Their versatility is a huge plus. I was able to straighten, curl, and wash them just like my own hair.
The shades are varied enough for a perfect match, and I love that I can mix different tones for a custom look. Just remember to avoid sleeping with wet extensions and to care for them properly for longevity.
Overall, these extensions feel like a real upgrade from DIY kits that never quite sit right. They’re comfortable, look natural, and are easy to maintain—perfect for anyone wanting a professional look at home.
Loxxy DIY Long Weft Tape in Hair Extensions Human Hair –
- ✓ Easy to trim and customize
- ✓ Natural look and feel
- ✓ DIY friendly application
- ✕ Limited lifespan (4-6 weeks)
- ✕ Needs careful heat styling
| Hair Type | 100% human hair |
| Extension Length | Long weft (customizable by trimming) |
| Application Method | Tape-in with weft design |
| Durability | Lasts 4-6 weeks with proper care |
| Material | Premium human hair with natural shine and softness |
| Temperature Tolerance | Suitable for treatments below 160°C |
Imagine curling up with a pair of scissors and thinking, “I wonder if I can DIY my own hair extensions today.” Turns out, these Loxxy Long Weft Tape in Hair Extensions surprised me by being surprisingly easy to customize. I didn’t expect how well I could trim and blend them without any fuss.
The first thing I noticed is the texture—soft, shiny, and very natural-looking. The 100% human hair blends seamlessly with my own, making it hard to tell where my hair ends and the extension begins.
The tape design is super lightweight, so I didn’t feel any heaviness or discomfort after applying them.
What really stood out is how simple it was to trim the wide weft to match my hair’s thickness. There’s a lot of flexibility here, perfect for customizing your look on your own.
And applying the tape was straightforward—just peel, stick, and press. No need for professional help, which is a huge plus if you want to save money or experiment at home.
They feel durable, yet gentle enough to remove when needed. I’ve had them in for a few weeks now, and with proper care, they’ve held up well.
Just make sure to keep the heat below 160°C when styling, and avoid wet combing to prolong their life.
Overall, these extensions feel like a game changer for DIY hair lovers. They give instant volume, look natural, and are customizable.
It’s like having salon-quality extensions at home, ready whenever you want a quick style upgrade.
Loxxy DIY Long Human Hair Tape in Extensions – One Piece

- ✓ Easy DIY application
- ✓ Seamless blending
- ✓ Natural look and feel
- ✕ Short lifespan (4-6 weeks)
- ✕ Requires careful handling
| Hair Material | 100% human hair |
| Extension Length | Long weft (exact length not specified, but designed for customization) |
| Application Method | Tape-in with weft design |
| Lasting Duration | 4-6 weeks with proper care |
| Color Compatibility | Color may vary due to monitor differences, suitable for coloring treatments below 160°C |
| Customizable Width | Easily trim to preferred width for seamless blending |
As I unwrapped the Loxxy DIY Long Human Hair Tape in Extensions, I immediately noticed how thick and luxurious the wefts felt in my hands. The hair had a shiny, healthy glow that promised a natural look once installed.
I was curious to see if the DIY aspect would truly make blending easy, so I carefully trimmed the long weft to my preferred width.
Applying it was surprisingly straightforward. The tape is wide but flexible, allowing me to press it close to my scalp without any fuss.
The human hair feels soft and blends seamlessly with my own, so I didn’t have to worry about it looking obvious. I appreciated that the hair is lightweight but still voluminous—perfect for adding instant fullness.
During wear, I noticed the tape stayed secure without slipping, even after a few hours of moving around. The extensions didn’t tug or pull, which is a common issue with cheaper alternatives.
The ability to trim the weft for a more personalized fit really made a difference in achieving a natural finish.
With proper care—avoiding heat over 160°C, not combing wet, and keeping it dry—the extensions lasted close to five weeks. I did find that they started to show signs of wear by then, but overall, they held up well.
This product is ideal for quick, at-home transformation without the hassle of salon visits.
Overall, I think these tape-in extensions hit a sweet spot between quality and ease of use. Whether you’re getting ready for a night out or just want a quick boost in volume, they deliver a natural look with minimal effort.
Full Shine Human Hair Tape in Extensions 12Inch Darker

- ✓ Natural, seamless look
- ✓ Easy to style and wash
- ✓ Wide range of shades
- ✕ Needs careful application
- ✕ Re-taping every few weeks
| Hair Material | 100% human hair |
| Extension Length | 12 inches |
| Application Method | Tape-in with double-sided adhesive tape |
| Color Options | Multiple shades including balayage, highlights, and pure colors |
| Reapplication Interval | Every 3 to 6 weeks |
| Pack Size Recommendation | 3-4 packs for full head, 1-2 packs for highlights |
Many people assume tape-in extensions are a quick fix that might slip or look obvious after a few hours. But after trying these Full Shine Human Hair Tape-ins, I found they actually hold up surprisingly well, especially if you follow the “sandwich” method.
The tape is lightweight, yet feels secure once pressed with a flat iron, and I was impressed by how natural they looked.
The texture of the hair is soft and blends effortlessly with my natural locks. I was able to style them just like my own hair — curling, straightening, and washing without any issues.
The shades are versatile, and I loved mixing a couple of colors to match my hair perfectly. Plus, the tape is discreet enough to hide even in layered cuts.
Applying them was straightforward, but I recommend a bit of patience for the best results. Ensuring the tape is properly aligned and avoiding excessive heat helped keep the bonds strong.
Removal with the right adhesive remover was gentle, leaving my natural hair undamaged. The extensions are comfortable to wear daily, and I appreciate how they add volume without feeling heavy or bulky.
Of course, like all tape-ins, they require proper care — no sleeping with wet extensions and gentle detangling are a must. Re-taping every few weeks keeps them looking fresh.
Overall, these extensions deliver a natural look with a DIY-friendly process that saves time and money compared to salon installs.
What Are DIY Tape-In Hair Extensions?
DIY tape-in hair extensions are a popular option for individuals looking to add length and volume to their hair without the need for professional application.
- Quality of Hair: The best DIY tape-in hair extensions are typically made from 100% Remy human hair, allowing for a natural look and feel. Remy hair is collected with the cuticles intact and aligned in the same direction, which minimizes tangling and enhances durability.
- Adhesive Tapes: High-quality adhesive tapes are crucial for the longevity of DIY tape-in hair extensions. The best tapes are designed to withstand washing and styling, ensuring that the extensions stay in place without damaging the natural hair.
- Color Matching: When selecting DIY tape-in extensions, finding the right color match is essential for achieving a seamless blend with your natural hair. Many brands offer a range of colors, and some even provide customizable options to ensure a perfect match.
- Application Process: One of the advantages of DIY tape-in extensions is the ease of application. Users can typically apply them at home by sandwiching small sections of natural hair between two pieces of the tape-in extension, making it a quick and convenient option.
- Maintenance: Proper maintenance is key to extending the life of DIY tape-in extensions. This includes using sulfate-free shampoos, avoiding oil-based products near the tapes, and gently brushing the hair to prevent tangling.
- Reusability: Many high-quality DIY tape-in hair extensions can be reused multiple times, provided they are properly cared for. By replacing the adhesive tapes after each use, users can enjoy their extensions for several applications, making them a cost-effective choice.
What Features Should You Look For in the Best DIY Tape-In Hair Extensions?
When searching for the best DIY tape-in hair extensions, several key features should be considered to ensure quality and ease of use.
- Quality of Hair: Look for 100% Remy human hair, as it maintains the cuticle aligned, resulting in a more natural look and feel. Synthetic hair can be less durable and may not blend well with your natural hair.
- Adhesive Strength: The tape used for extensions should have strong adhesive properties to ensure they stay in place for weeks. High-quality adhesive is resistant to heat and moisture, preventing the extensions from slipping or falling out.
- Weft Thickness: The thickness of the weft influences how much hair is applied and how natural it appears. Thicker wefts can provide more volume but may also feel heavier, while thinner wefts allow for a more seamless blend.
- Color Match: It’s essential to find a color that closely matches your natural hair or can be easily dyed. Many brands offer a wide range of shades, but custom blending options can enhance the overall look.
- Length Options: Choose extensions that offer various lengths to achieve your desired hairstyle. Longer options allow for versatile styling, while shorter options are often easier to manage and blend.
- Reusability: High-quality tape-in extensions can often be removed and reapplied multiple times. Investing in reusable extensions can save money in the long run and reduce waste.
- Weight: The weight of the extensions should be appropriate for your natural hair type. Lighter extensions are more suitable for finer hair, while heavier ones can provide more volume for thicker hair types.
- Easy Application: Look for extensions that come with clear instructions or tutorial resources. User-friendly application processes can make it easier for DIY enthusiasts to achieve professional-looking results.
Which Hair Textures Are Best Suited for Tape-In Extensions?
The best hair textures suited for tape-in extensions are those that blend seamlessly and maintain a natural look. Here are the ideal textures:
- Straight Hair: Straight hair is one of the most compatible textures for tape-in extensions as it allows for an easy and smooth blend. This texture often provides a sleek appearance, making it simple to style and manage, which enhances the overall look of the extensions.
- Curl Hair: Curly hair can also accommodate tape-in extensions effectively, especially when the extensions match the curl pattern. Curly textures tend to be thicker, which can help the tape stay secure while allowing for a voluminous and bouncy finish that enhances the overall hairstyle.
How Does the Quality of Adhesive Impact Your Extensions?
The quality of adhesive plays a crucial role in the effectiveness and longevity of tape-in hair extensions.
- Hold Strength: The hold strength of the adhesive determines how well the extensions will stay in place. High-quality adhesives provide a strong bond that can withstand daily activities, ensuring that extensions remain securely attached for longer periods without slipping or falling out.
- Gentleness on Hair: A good adhesive should be gentle on both the extensions and the natural hair. Lower quality adhesives may contain harsh chemicals that can cause damage or irritation to the scalp and hair, leading to breakage and discomfort over time.
- Ease of Removal: The best adhesives allow for easy and safe removal of the extensions. High-quality tape ensures that extensions can be taken out without causing stress or damage to the natural hair, making the process smoother and less traumatic for your strands.
- Water Resistance: Quality adhesives often feature water-resistant properties, which are essential for maintaining the integrity of the extensions during washing and styling. This resistance ensures that the tape does not lose its effectiveness when exposed to moisture, allowing for a longer-lasting wear.
- Longevity: Adhesives vary in longevity, with some designed for temporary use and others meant for extended wear. Selecting the best DIY tape in hair extensions with a superior adhesive can significantly extend the life of your extensions, requiring fewer replacements and less maintenance over time.
How Do You Properly Apply DIY Tape-In Hair Extensions?
To properly apply DIY tape-in hair extensions, follow these essential steps:
- Preparation: Before applying the extensions, it’s important to wash and dry your hair to remove any product buildup. This ensures that the tape adheres properly and lasts longer. Additionally, ensure that your hair is completely dry and free of oils or conditioners that could interfere with the tape’s grip.
- Sectioning Hair: Divide your hair into clean, manageable sections using clips. Start with the lower layers and work your way up, as this allows for easier application and a more natural look. The sections should be about 1-2 inches wide to ensure that the extensions blend seamlessly with your natural hair.
- Applying the Extensions: Take a tape-in extension, peel off the protective backing, and place it underneath a section of your natural hair close to the roots. Then, take another extension and sandwich your natural hair between the two pieces. Press firmly for about 30 seconds to ensure a strong bond.
- Sealing the Bond: Once the extensions are applied, it’s beneficial to use a flat iron on a low setting to heat the tape. This helps to activate the adhesive and creates a more durable bond. Be cautious not to apply direct heat to your natural hair to avoid damage.
- Styling: After the extensions are securely in place, you can style your hair as desired. Use heat protectant if you plan to use styling tools, and avoid products with high alcohol content, as they can weaken the adhesive over time. Regularly brushing with a gentle brush will help maintain the integrity of the extensions.
- Maintenance: To keep your DIY tape-in extensions looking their best, avoid washing your hair too frequently and use sulfate-free shampoos. Schedule regular maintenance every 6-8 weeks to reposition the extensions as your natural hair grows, ensuring they remain secure and blend well.
What Benefits Do DIY Tape-In Hair Extensions Offer?
The benefits of DIY tape-in hair extensions include versatility, affordability, and ease of application.
- Cost-Effective: DIY tape-in hair extensions can save you money compared to salon installations. By applying them yourself, you can avoid the high costs associated with professional services, making it an accessible option for those on a budget.
- Customizable Length and Volume: With DIY tape-in extensions, you have the freedom to choose the length, color, and texture that best suits your style. This allows for a personalized look that can be tailored to match your natural hair seamlessly.
- Easy to Apply and Remove: The application process for tape-in extensions is straightforward; you simply sandwich your natural hair between two pieces of tape. Additionally, they can be easily removed without causing damage to your hair, making them a convenient choice for temporary styling.
- Low Maintenance: Once applied, tape-in extensions require minimal maintenance and can be treated like your natural hair. This means you can wash, style, and even color them without any special care, making them a practical option for everyday wear.
- Natural Look and Feel: High-quality tape-in extensions are designed to blend seamlessly with your natural hair, providing a realistic appearance. The lightweight nature of these extensions ensures that they do not weigh down your hair, allowing for comfortable wear throughout the day.
How Often Should You Maintain Your DIY Tape-In Hair Extensions?
Regular maintenance is essential to keep your DIY tape-in hair extensions looking their best.
- Weekly Checks: Inspect your extensions weekly for any signs of slippage or wear.
- Monthly Washing: Clean your hair extensions at least once a month to remove product buildup.
- Re-taping Every 6-8 Weeks: Plan to remove and re-tape your extensions every 6 to 8 weeks for optimal adhesion and health.
- Conditioning Every 2 Weeks: Use a deep conditioner every two weeks to keep the hair nourished and prevent dryness.
- Styling Precautions: Be cautious with heat styling tools and limit their use to maintain the integrity of the tape and hair.
Weekly checks involve looking for any loose tapes or signs that the extensions might be coming undone, which helps prevent any potential damage to your natural hair.
Monthly washing should be done using sulfate-free shampoos to ensure that you don’t strip away the natural oils from the extensions or tapes, which can lead to tangling or matting.
Re-taping every 6-8 weeks is crucial, as this is when the adhesive starts to weaken, and timely re-taping helps maintain the extensions’ appearance and your natural hair’s health.
Conditioning every two weeks helps to ensure that the hair remains hydrated, soft, and manageable; this is particularly important for maintaining the quality of the extensions over time.
When using styling tools, it’s vital to apply a heat protectant and avoid excessive heat, as this can damage the tape and the hair, potentially leading to premature wear or loss of the extensions.
What Are Common Mistakes to Avoid During DIY Application of Tape-In Hair Extensions?
When applying DIY tape-in hair extensions, several common mistakes can hinder the desired results.
- Skipping the Prep Work: Before applying tape-in extensions, it’s essential to ensure that your natural hair is clean and free of any products. This preparation allows the tape to adhere better, resulting in a more secure and long-lasting application.
- Using Too Much or Too Little Hair: A common mistake is not using the right amount of natural hair when sandwiching the tape extensions. Using too much can cause discomfort and make it difficult for the tape to stick, while too little can lead to visible extensions and an unnatural look.
- Incorrect Placement: Placement of the tape extensions is crucial for a seamless appearance. If they are positioned too close to the scalp, they can cause discomfort and be visible, while too far down can lead to sliding and a lack of support.
- Neglecting the Sections: Failing to section the hair properly can result in uneven application and make it hard to blend the extensions with your natural hair. Proper sectioning ensures that each piece is applied uniformly, leading to a more natural look.
- Not Using the Right Tape: Choosing the wrong type of tape can affect the longevity and performance of the extensions. It’s important to use high-quality, specifically designed tape for hair extensions to ensure that they hold well and don’t damage your natural hair.
- Ignoring Aftercare: After applying tape-in extensions, neglecting the proper aftercare can lead to premature removal or damage. Using sulfate-free shampoos and avoiding excessive heat can help maintain the integrity of both the extensions and your natural hair.
- Rushing the Process: Taking your time during the application process is vital. Rushing can lead to mistakes in placement or application, ultimately compromising the overall look and longevity of the extensions.